

How To Draw A Perfume Bottle

In this tutorial, you will notice how you can easily depict a vector perfume bottle in Illustrator with the help of the 3D Revolve event. You will also learn to create an original semi-transparent texture for the glass and how to apply information technology on the bottle surface using the Map Fine art options. Let's become to work!
Draw the Canteen Shape
1. We will start by using the 3D issue to create the body of the canteen then the personalized glass texture can be applied using the Map Fine art option. Take the Pen Tool and draw the path that you can meet below so go to Effect > 3D > Circumduct, set the values from the next prototype and you will obtain the body for the perfume bottle.


Draw the Glass Texture
ii. Employ the Polygon Tool or the Pen Tool to draw the next shape then multiply it to create the texture from beneath sufficiently big to cover the body of the canteen. When yous are done group all the shapes.

3. For the next step it's important to fill the shapes and delete the strokes, so you lot tin choose whatever color to do that. To be able to use the Map Art choice yous must save the texture group as a symbol then drag it into the Symbols Panel and select Graphic.

Utilize the Texture
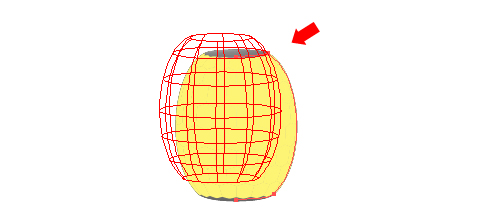
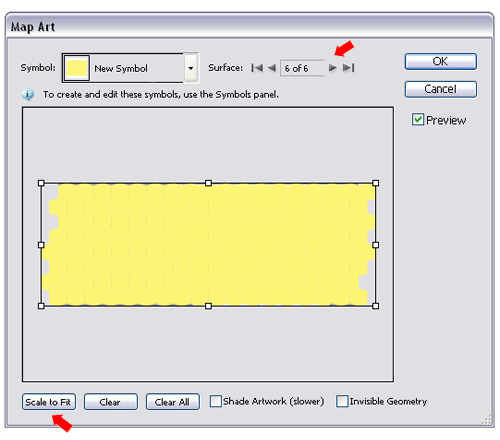
iv. Select the body of the canteen, go to the Appearance Console and double click on the 3D Revolve effect that you applied earlier to open up the 3D Revolve Options window so click on the Map Art button to open the Map Art window that you can see below. Click on the arrow indicated in the image to select the surface that corresponds with the front end side of the bottle (mine was surface 6). Next select the symbol that you saved and then click on the Scale to fit push button and you lot should see the texture applied on the body like below.Yous could select also the surface for the back of the body and employ the texture and too the other settings that will follow just like for the front side but the last image will expect almost the same and so it'due south better to go along information technology simple and brand the work easier.
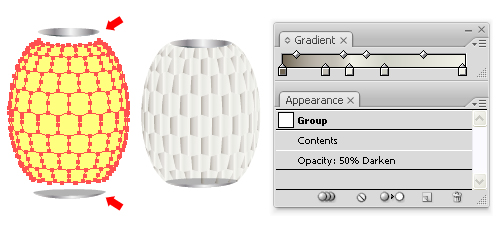
5. When you are done go to Object and Expand Advent then delete all the other many shapes and ovals that will consequence later expanding except the texture group and the top and the bottom ovals that fit (it should exist the bigger one from the grouping of many ovals on peak and the bigger one from the group at the bottom – I separated them so you lot can meet them better). As well find and keep the basic shape of the body because you lot will need it later (see the image at the step vii). Delete all the other many shapes.
Next fill the texture grouping with a linear gradient using the following colors: (R=111,G=100,B=82), (R=193,G=188,B=179), (R=242,Grand=241,B=232), (R=209,Thousand=210,B=199) and over again (R=242,Yard=241,B=232) then set up the Blending mode to Darken and lower the Opacity to l% to obtain the semi-transparent await for the glass.
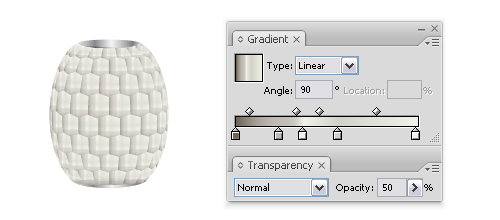
6. Now Copy and Paste in dorsum the texture group, go along the same slope but select a 90 degrees angle value, keep the Opacity at fifty% and set the Blending mode back to Normal.
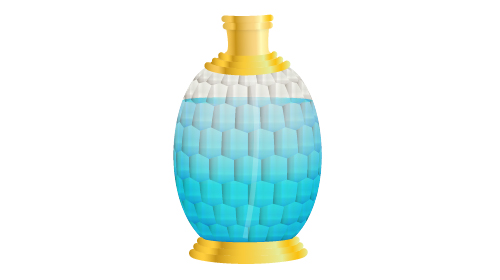
Draw the Perfume Inside
7. To make the liquid inside the bottle take the basic shape of the body that I said to go along at the step v then depict an oval using the Ellipse Tool on summit and duplicate it. Now have the Direct Selection Tool and select the top point of the oval, delete it and use the Pen Tool to alter and close the path like yous tin see below. Select both the body shape and the modified one and click on Subtract from shape surface area > Expand from the Pathfinder Panel to obtain the liquid shape.

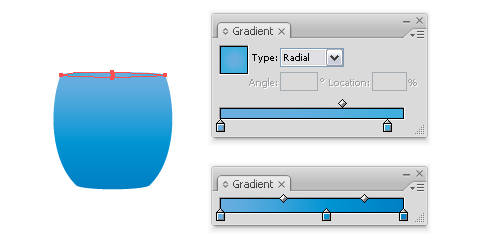
8. To make full the liquid shape, I used a linear gradient with the following blueish tones: (R=104,G=174,B=223), (R=0,Thousand=148,B=211), (R=0,G=127,B=195) and to make full the top oval I selected a radial gradient from (R=104,One thousand=174,B=223) to (R=64,G=175,B=222).
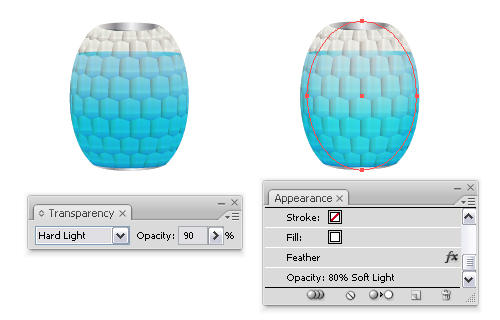
9. Group the 2 shapes and place them between the first texture group from the pace 5 and the 2nd ane (step half-dozen), alter the Blending style to Difficult Light and lower the Opacity to 90%. I wanted the sides of the torso to be a flake darker so the middle part, as it should be for a round canteen, so take the Ellipse Tool and draw an oval on superlative of the liquid group, make full it with white, go to Effect > Stylize > Plume and select a big value for the Feather Radius like 20-25 depending on your bottle size. Next reduce the Opacity to eighty% and set to Soft Light.
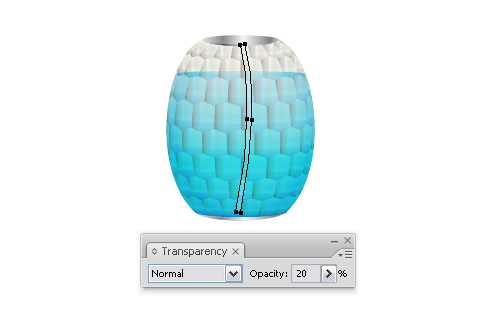
ten. At present take the Pen Tool and draw a lightly curved path, give it a v pt Stroke then go to Object and Aggrandize it. Fill it with white and lower the Opacity to 20%.
Describe the Bottom nd the Pinnacle of the Bottle
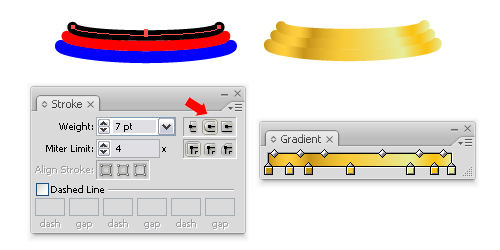
11. Use the Pen Tool and draw iii curved paths, select for the first 2 a seven pt Stroke and for the terminal one 8 pt then click on the Round Cap button. Expand them and fill them with a gilt gradient.
12. To make the superlative gold parts of the perfume canteen commencement take the Pen Tool and draw the first shape in the image then do the same like to a higher place and draw the other golden curved shapes. For a little shadow Copy and Paste in back i of the ii curved shapes at the top, make it a scrap smaller, change the fill to a dark gray, become to Effect > Blur and utilise a 1.7 px Gaussian Blur then reduce the Opacity to x %.

13. Group all the shapes and here is how the perfume bottle should look at this point:
Draw the Chapeau of the Bottle
xiv. You tin can just make the lid by drawing the following shapes, group them all and fill them with a linear slope using blueish tones like: (R=157,G=210,B=218), (R=91,G=186,B=199) and (R=0,G=148,B=211).

Add Some Design Elements
fifteen. First permit's add some glow so take the Ellipse Tool and depict an oval shape, fill it with white, go to Outcome > Stylize and select a 20-22 Feather Radius, reduce the Opacity to 55% and set to Lighten.

16. Now get to the Symbols Panel, open the Symbol Libraries Menu > Artistic Textures notice Impressionism and drag information technology into your working surface area. Expand the symbol and delete some parts of information technology to obtain something like in the paradigm below, then brand more copies and identify them like in the image. Group them, place them on top of the hat, change the Blending mode to Screen and lower the Opacity.
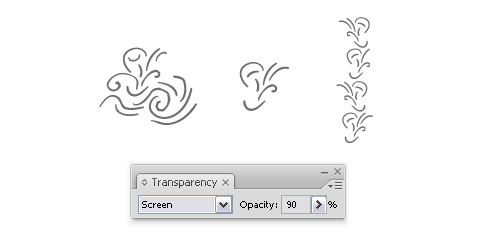
17. For the elements on tiptop of the bottle, copy the ones made to a higher place then become to Effect/Warp/Inflate and set the values like in the next image. Now place the group on top of the body, lower the Opacity to 70% and set to Screen also.

18. Run across here how to place the artistic elements and how the bottle looks similar:

The Final Perfume Bottle
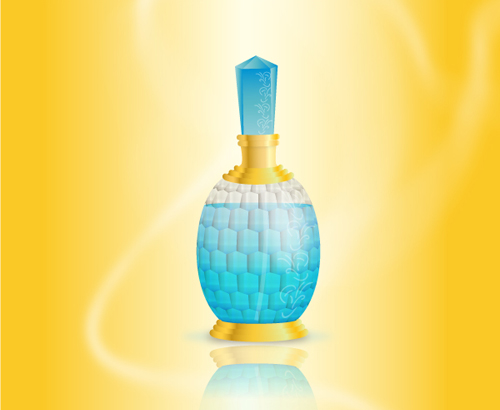
The tutorial is washed, promise you lot enjoyed it and found information technology easy to follow. Next week, I volition evidence yous another technique of drawing a different perfume bottle. Then come up back again for more illustrator tutorials.
To download the source file for this tutorial, yous will demand to login as a member.
Sign up today to admission all exclusive members content!

Source: https://www.vectordiary.com/how-to-draw-a-perfume-bottle/
0 Response to "How To Draw A Perfume Bottle"
Post a Comment